This article lists steps to install a Postfix mail server in combination with Courier IMAP on Debian 11 or Ubuntu 20.04 Linux servers. Postfix will be configured for sending and storing received emails in Maildir format. Courier IMAP gives remote clients access to Maildir folders. Before you begin with the installation you may want to check basic configuration steps setting up V-Servers for mail service.
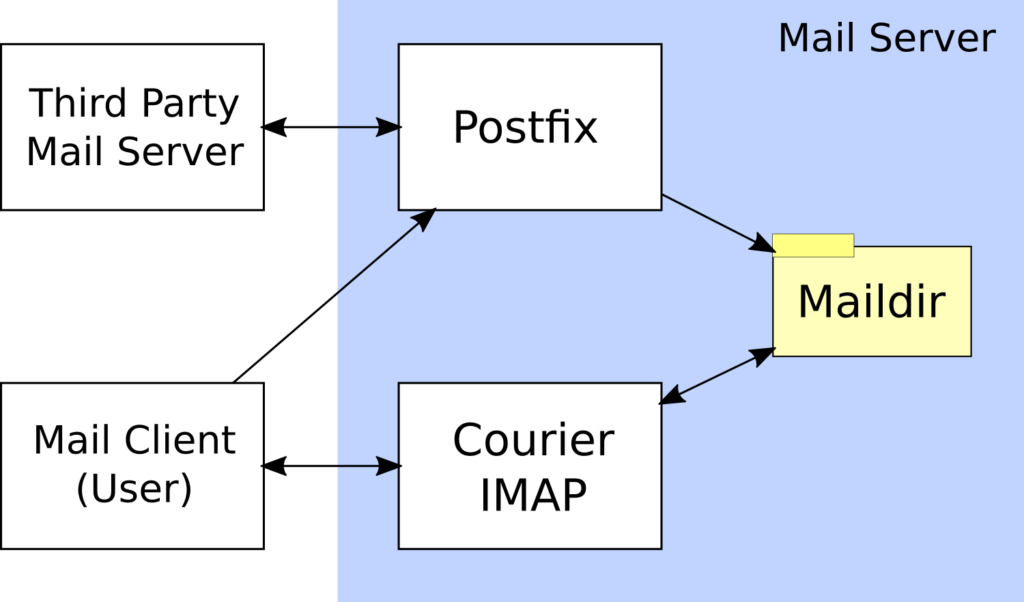
The Flow Diagram gives an overview of how mail server components interact with each other and the outside world. We are about to install Postfix with Courier IMAP, the components in the blue rectangle on our sever. Within the blue rectangle, Postfix stores emails as text files into a Maildir file system folder, and Courier IMAP reads and writes email files from or to Maildir. End users with mail clients connect to Courier IMAP to read, move or delete emails. For outgoing emails, mail clients first submit messages to Postfix for sending and afterwards to Courier for storing a copy in the sent folder. Note that users with their mail clients never interact directly with third party mail servers. Postfix handles the exchange with the outside world, whereas Courier IMAP gives mail clients access to stored messages.
Postfix With Courier IMAP Installation Steps
The Postfix with Courier IMAP installation steps will include mailbox and alias management in a MariaDB/MySQL database, SPF checks, OpenDKIM signatures, and Amavis content checker interface with SpamAssassin mail filtering enabled.
Step 1: Install MariaDB and Set Up Mailer Tables
As a MySQL distribution, I recommend installing MariaDB because this open source database provides the classic MySQL command line interface.
root:$ apt-get install mariadb-server mariadb-clientAll DB connections in this article originate from localhost. Therefore, be sure to block port 3306 in your firewall settings unless you know you need to connect from externally. Then, set a root password:
root:$ mysql -u root
MariaDB > alter user 'root'@'localhost' identified by 'rootpassword';
MariaDB > flush privileges;
MariaDB > exit;
Now log into MySQL as root; you will be prompted for your password:
root:$ mysql -u root -p Then, at the MariaDB prompt, create a mail user and mail database:
create database maildb;
create user mail@localhost identified by 'YourMaildbPw';
grant all on maildb.* to mail@localhost;
Afterwards, log off as root, and log back in as mail user:
root:$ mysql -u mail -p maildbNow, at the MariaDB prompt, create tables for users, domains and aliases:
CREATE TABLE `domains` (
`pkid` smallint(6) NOT NULL auto_increment,
`domain` varchar(120) NOT NULL default '',
`transport` varchar(120) NOT NULL default 'virtual:',
`enabled` tinyint(1) NOT NULL default '1',
PRIMARY KEY  (`pkid`)
) ;
CREATE TABLE `users` (
`id` varchar(128) NOT NULL default '',
`name` varchar(128) NOT NULL default '',
`uid` smallint(5) unsigned NOT NULL default '5000',
`gid` smallint(5) unsigned NOT NULL default '5000',
`home` varchar(255) NOT NULL default '/home/virtual/mailboxes',
`maildir` varchar(255) NOT NULL default 'blah_postbox/',
`enabled` tinyint(1) NOT NULL default '1',
`change_password` tinyint(1) NOT NULL default '1',
`clear` varchar(128) NOT NULL default 'ClearPwIfNeeded',
`crypt` varchar(128) NOT NULL default 'PwNeverToUse',
`quota` varchar(255) NOT NULL default '',
`spamlevel` varchar(255) NOT NULL default 'normal',
PRIMARY KEY (`id`),
UNIQUE KEY `id` (`id`)
) ;In the users table, the ‘clear’ field is optional because the server will only use encrypted passwords from the ‘crypt’ field. Hence, you could drop the field, leave the default or fill clear passwords as a reminder for yourself. Also optional are the ‘change_password’ and ‘spamlevel’ fields. Spamlevel settings later activate additional checks for accounts experiencing high spam loads.
CREATE TABLE `aliases` (
`pkid` smallint(6) NOT NULL auto_increment,
`mail` varchar(120) NOT NULL default '',
`destination` varchar(120) NOT NULL default '',
`enabled` tinyint(1) NOT NULL default '1',
PRIMARY KEY  (`pkid`),
UNIQUE KEY `mail` (`mail`)
) ;
You may want to check created tables with ‘describe tablename;’. The domains table will define which fully qualified domain names our mail service will service. Insert these records at the MariaDB prompt:
insert into domains (domain) values
('localhost'),
('localhost.localdomain'),
('yourdomain.com')
;
Afterwards, create a mail account in the users table.
insert into users (id, name, maildir, crypt) values
('[email protected]', 'postbox_yourdomain_com',
 'yourdomain.com/postbox/',
 encrypt('loginpwd', CONCAT('$5$', MD5(RAND())))
);
This tells the mail server to store incoming messages for user ‘[email protected]’ under /home/virtual/mailboxes/yourdomain.com/postbox. Pick a strong login password. Finally, create some aliases for your email addresses:
insert into aliases (mail, destination) values
('[email protected]', '[email protected]'),
('[email protected]', 'postbox@yourdomain,com')
;
With the two alias records, mails for multiple variations of your name will all be referred to the postbox account.
For later, when we will be testing the mail server, we can activate logging for MySQL queries by adding a file 50-tempmailconfig.cnf under mariadb.conf.d:
root:$ cd /etc/mysql/mariadb.conf.d
root:$ cat 50-tempmailconfig.cnf
[mysqld]
general_log_file=/var/log/mysql/mysql.log
general_log=1
root:$ /etc/init.d/mysql restart
When done with testing, delete the file 50-tempmailconfig.cnf as extensive logging impacts performance.
Step 2: Install Postfix
Before installing Postfix with MySQL maps, check for already running mail servers:
root:$ nmap -sT -p 25 localhostIf the port scan indicates an open port 25, the system already has a mail server that needs be removed. For instance:
root:$ apt-get remove sendmailNow install Postfix with MySQL:
apt-get install postfix postfix-mysqlIf prompted during the installation, choose internet-site and put your good reverse DNS record as hostname. Assuming your mailerhost and reverse DNS is mail.yourdomain.com, put it in /etc/mailname.
root:$ cat /etc/mailname
mail.yourdomain.com
Now, edit the Postfix main configuration file:
vim /etc/postfix/main.cfIn main.cf, replace the following configuration values, or add them if not yet present:
# changes in /etc/postfix/main.cf

# remove ubuntu from greeting to not reveal OS to attackers
smtpd_banner = $myhostname ESMTP $mail_name

myorigin = /etc/mailname

# allow IPv4 and IPv6
inet_interfaces = all
inet_protocols = all

myhostname = mail.yourdomain.com
mydestination = $myhostname, localhost.yourdomain.com, , localhost
# leave relayhost blank unless you are using one
relayhost =

# time until warning message to sender if undelivered
delay_warning_time = 4h
# error code for bad / nonexistent recipient
unknown_local_recipient_reject_code = 450
# how long to keep trying
maximal_queue_lifetime = 7d
# max and min time in seconds between retries if connection failed
minimal_backoff_time = 1000s
maximal_backoff_time = 8000s
# how long to wait when servers connect before receiving rest of data
smtp_helo_timeout = 60s
# how many addresses can be used in one message.
# effective stopper to mass spammers, accidental copy in whole address list
# but may restrict intentional mail shots.
smtpd_recipient_limit = 16
# how many error before back off.
smtpd_soft_error_limit = 3
# how many max errors before blocking it.
smtpd_hard_error_limit = 12

# smtpd anti-spam anti-abuse settings
# Requirements for the HELO statement
smtpd_helo_restrictions = permit_mynetworks, warn_if_reject reject_non_fqdn_hostname, reject_invalid_hostname, permit
# Requirements for the sender details
smtpd_sender_restrictions = permit_sasl_authenticated, permit_mynetworks, warn_if_reject reject_non_fqdn_sender, reject_unknown_sender_domain, reject_unauth_pipelining, permit
# Requirements for the connecting server
smtpd_client_restrictions = reject_rbl_client sbl.spamhaus.org, reject_rbl_client blackholes.easynet.nl
# Requirement for the recipient address
smtpd_recipient_restrictions = permit_sasl_authenticated, reject_unauth_pipelining, permit_mynetworks, reject_non_fqdn_recipient, reject_unknown_recipient_domain, reject_unauth_destination, permit
smtpd_data_restrictions = reject_unauth_pipelining

# More spam settings
# require proper helo at connections
smtpd_helo_required = yes
# waste spammers time before rejecting them
smtpd_delay_reject = yes
disable_vrfy_command = yes

# word is alias maps needed for local aliasing
alias_maps = hash:/etc/postfix/aliases
alias_database = hash:/etc/postfix/aliases

# this specifies where the virtual mailbox folders will be located
virtual_mailbox_base = /home/virtual/mailboxes
# this is for the mailbox location for each user
virtual_mailbox_maps = mysql:/etc/postfix/mysql_mailbox.cf
# and this is for aliases
virtual_alias_maps = mysql:/etc/postfix/mysql_alias.cf
# and this is for domain lookups
virtual_mailbox_domains = mysql:/etc/postfix/mysql_domains.cf

# user and group ID mapping for system user 'virtual'
virtual_uid_maps = static:5000
virtual_gid_maps = static:5000

# TLS parameters
smtpd_tls_cert_file=/etc/postfix/postfix.cert
smtpd_tls_key_file=/etc/postfix/postfix.key
After changes in main.cf, create the file for local aliases, redirecting a couple of standard accounts to postmaster:
root:$ cat /etc/postfix/aliases
# /etc/postfix/aliases
postmaster: postmaster
mailer-daemon: postmaster
hostmaster: postmaster
webmaster: postmaster
Now create the aliases DB /etc/postfix/aliases.db:
root:$ postalias /etc/postfix/aliasesAdd the virtual mailbox system user:
root:$ mkdir /home/virtual
root:$ groupadd --system virtual -g 5000
root:$ useradd --system virtual -u 5000 -g 5000
root:$ chown -R virtual:virtual /home/virtual
root:$ chmod g+s /home/virtual
root:$ ls -ld /home/virtual
drwxr-sr-x 5 virtual virtual 4096 Jan 28 03:29 /home/virtual
Now correct the virtual user line in /etc/passwd for no login users:
root:$ grep virtual /etc/passwd
virtual:x:5000:5000::/home/virtual:/usr/sbin/nologin
Now create the MySQL mapping files for users, domains and aliases under /etc/postfix:
root:$ cd /etc/postfix
root:$ cat mysql_mailbox.cf
user=mail
password=YourMaildbPw
dbname=maildb
table=users
select_field=maildir
where_field=id
hosts=127.0.0.1
root:$
root:$ cat mysql_alias.cf
user=mail
password=YourMaildbPw
dbname=maildb
hosts=127.0.0.1
query=select destination from aliases where mail='%s' and enabled=1
root:$
root:$ cat mysql_domains.cf
user=mail
password=YourMaildbPw
dbname=maildb
table=domains
select_field=domain
where_field=domain
hosts=127.0.0.1
additional_conditions = and enabled = 1
Because of the plain passwords, it’s probably wise to prevent others from reading mapping files:
root:$ chmod o-r mysql_mailbox.cf mysql_alias.cf mysql_domains.cf
root:$ chown -R root.postfix /etc/postfix
Finally, generate new TLS certificates, which we can later replace with properly signed ones. The command generates postfix.key and postfix.cert files under /etc/postfix:
root:$ cd /etc/postfix
root:$ openssl req -new -outform PEM -out postfix.cert -newkey rsa:2048 -nodes -keyout postfix.key -keyform PEM -days 3825 -x509
This completes the configuration for receiving emails. Restart Postfix and test.
root:$ /etc/init.d/postfix restartSend test emails to [email protected] or any other alias or postbox. For each email, your should find a file in the virtual mail folder:
root:$ cd /home/virtual/mailboxes/yourdomain.com
root:$ find -type f
postpox/new/1643822705.M570065P96400V000000005B20B661I00000000008A4A34_0
Don’t proceed with subsequent installation steps until you find email files under your virtual folder. Check /var/log/mysql/mysql.log and /var/log/mail.log for errors.
Step 2.1: Optionally Test Catchall Mailbox
Knowledge is power and a first line defense against spammers. By rejecting mails to nonexistent accounts, spammers may probe your server for email addresses you use. They may keep sending emails to all kinds of possible account names for yourdomain.com until they find one for which you don’t reject mails. Therefore you may never want to bounce emails, and instead add a catchall dumpster account receiving messages for unused aliases. Here is a short manual on how to add a proper catchall with postfix-mysql.
Step 3: Install Courier IMAP
Once Postfix is storing received mails in the virtual mailbox folder, we can install Courier IMAP to access those email files from mail clients like Thunderbird.
root:$ apt-get install courier-base courier-authdaemon courier-authlib-mysql courier-imapOlder installation references mention packages courier-imap-ssl and courier-ssl, which are both part of other courier packages on Ubuntu 20.04 and Debian 11. In /etc/courier/authdaemonrc, set the auth module to mysql and activate debug logging:
# /etc/courier/authdaemonrc
authmodulelist="authmysql"
DEBUG_LOGIN=2
As ‘DEBUG_LOGIN=2’ logs passwords in mail.log, you may want to lower the log level when done testing. Now, edit /etc/courier/authmysqlrc:
# /etc/courier/authmysqlrc
MYSQL_USERNAME          mail
MYSQL_PASSWORD          YourMaildbPw

MYSQL_DATABASE          maildb
MYSQL_USER_TABLE        users

MYSQL_MAILDIR_FIELD     concat(home,'/',maildir)
MYSQL_WHERE_CLAUSE enabled=1
The file authmysqlrc should not be readable to others to protect the password. Now, restart everything courier:
root:$ /etc/init.d/courier-imap restart
root:$ /etc/init.d/courier-imap-ssl restart
root:$ /etc/init.d/courier-authdaemon restart
Now test if you can access your emails with IMAP. Create an account in some mail client, like Thunderbird, with server name mail.yourdomain.com, Port 993, user name [email protected], connection security SSL/TLS, and authentication method normal password.
Since the TLS certificates are yet unsigned, in order to connect you will need to click away some security warnings from your mail client.
Also, if you get fam/gamin error messages accessing your folders, you may need to install gamin.
# to get rid of file system fam/gamin messages, install gamin
apt-get install gamin
Step 4: Install SASL Authentication for Sending
To securely run a mail server, we need to have some client authentication for sending. Mail clients should always use the mail server as a relay host, but we need to prevent abuse. Having an open relay would be an invitation for spammers to send their crap from our server. This is where SASL authentication comes in:
root:$ apt-get install libsasl2-modules libsasl2-modules-sql libgsasl7 libauthen-sasl-cyrus-perl sasl2-bin libpam-mysqlWe now need to allow Postfix to read SASL files by adding the postfix user to the sasl group. The group commands just for demonstration, you just need the adduser command:
root:$ groups postfix
postfix : postfix
root:$ adduser postfix sasl
Adding user `postfix' to group `sasl' ...
root:$ groups postfix
postfix : postfix sasl
Create a directory for SASL and its socket under the Postfix chroot:
root:$ mkdir -p /var/spool/postfix/var/run/saslauthdAdd the following lines to Postfix main.cf:
# add to /etc/postfix/main.cf
# SASL
smtpd_sasl_auth_enable = yes
# If your potential clients use Outlook Express or other older clients
# this needs to be set to yes
broken_sasl_auth_clients = no
smtpd_sasl_security_options = noanonymous
smtpd_sasl_local_domain =

smtp_tls_security_level = may
smtpd_tls_security_level = may
smtp_tls_note_starttls_offer = yes
smtpd_tls_loglevel = 1
smtpd_tls_received_header = yes
smtpd_tls_session_cache_timeout = 3600s
tls_random_source = dev:/dev/urandom
smtpd_tls_cert_file=/etc/postfix/postfix.cert
smtpd_tls_key_file=/etc/postfix/postfix.key
Furthermore, in main.cf, you need to make sure the smtpd_sender_restrictions, smtpd_recipient_restrictions and smtpd_relay_restrictions include permit_sasl_authenticated. The respective lines in my main.cf read like this:
# from /etc/postfix/main.cf
smtpd_relay_restrictions = permit_mynetworks permit_sasl_authenticated defer_unauth_destination
smtpd_sender_restrictions = permit_sasl_authenticated, permit_mynetworks, warn_if_reject reject_non_fqdn_sender, reject_unknown_sender_domain, reject_unauth_pipelining, permit
smtpd_recipient_restrictions = permit_sasl_authenticated, reject_unauth_pipelining, permit_mynetworks, reject_non_fqdn_recipient, reject_unknown_recipient_domain, reject_unauth_destination, permit
Add this section to /etc/postfix/master.cf:
# enable submission and smptds
submission inet n       -       y       -       -       smtpd
 -o smtpd_sasl_auth_enable=yes
 -o smtpd_tls_auth_only=yes
 -o smtpd_client_restrictions=permit_sasl_authenticated,reject_unauth_destination,reject
 -o smtpd_sasl_security_options=noanonymous,noplaintext
 -o smtpd_sasl_tls_security_options=noanonymous
smtps     inet  n       -       y       -       -       smtpd
 -o smtpd_tls_wrappermode=yes
 -o smtpd_sasl_auth_enable=yes
 -o smtpd_tls_auth_only=yes
 -o smtpd_client_restrictions=permit_sasl_authenticated,reject
 -o smtpd_sasl_security_options=noanonymous,noplaintext
 -o smtpd_sasl_tls_security_options=noanonymous
In /etc/default/saslauthd, verify or change these values:
# /etc/default/saslauthd
START=yes
OPTIONS="-r -c -m /var/spool/postfix/var/run/saslauthd"
Create the SASL smtpd.conf, again not readable for others to protect the password:
root:$ cat /etc/postfix/sasl/smtpd.conf
pwcheck_method: saslauthd
mech_list: plain login cram-md5 digest-md5
log_level: 7
allow_plaintext: true
auxprop_plugin: sql
sql_engine: mysql
sql_hostnames: 127.0.0.1
sql_user: mail
sql_passwd: YourMaildbPw
sql_database: maildb
sql_select: select crypt from users where id='%u@%r' and enabled = 1
Now edit /etc/pam.d/smtp. Be sure to comment out the @include defaults, they break SASL:
#@include common-auth
#@include common-account
#@include common-password
#
# added for postfix sasl
#
auth required pam_mysql.so user=mail passwd=YourMaildbPw host=127.0.0.1 db=maildb table=users usercolumn=id passwdcolumn=crypt crypt=1
account sufficient pam_mysql.so user=mail passwd=YourMaildbPw host=127.0.0.1 db=maildb table=users usercolumn=id passwdcolumn=crypt crypt=1
Then, in /etc/courier/imapd, we need to include authentication capabilities for SASL.
# /etc/courier/imapd
# add AUTH=CRAM-MD5 AUTH=CRAM-SHA1 AUTH=CRAM-SHA256 capabilities
IMAP_CAPABILITY="IMAP4rev1 UIDPLUS CHILDREN NAMESPACE THREAD=ORDEREDSUBJECT THREAD=REFERENCES SORT QUOTA AUTH=CRAM-MD5 AUTH=CRAM-SHA1 AUTH=CRAM-SHA256 IDLE"
Now, restart processes. As root:
/etc/init.d/postfix restart
/etc/init.d/courier-authdaemon restart
/etc/init.d/courier-imap restart
/etc/init.d/courier-imap-ssl restart
/etc/init.d/saslauthd restart
Verify folder permissions for SASL and change if group sasl has no access:
root:$ ls -ld /var/spool/postfix/var/run/saslauthd
drwx--x--- 2 root sasl /var/spool/postfix/var/run/saslauthd
Now test sending emails with these SMTP server settings: connection security SSL/TLS, authentication method normal password, user name [email protected], port 465.
Step 5: Set Up Spam Filters
I recommend defensive spam filtering. Detect as much spam as possible, but avoid false positives as having to sieve spam folders for legit mails defeats the purpose of spam filtering. In my proposed setup I reject mails with failing SPF check and I employ Amavis filter framework with SpamAssassin. One might consider adding virus checks, but I feel Greylisting is overblown as this method may significantly delay mails from new senders.
Step 5.1: Activate SPF Checks
To verify Sender Policy Framework (SPF) compliance of incoming messages, first install SPF Python scripts:
root:$ apt-get install postfix-policyd-spf-pythonNow modify /etc/postfix/master.cf and add an entry for policyd-spf:
# add to /etc/postfix/master.cf under section
#
# Other external delivery methods.
#
policyd-spf  unix  -       n       n       -       0       spawn
    user=policyd-spf argv=/usr/bin/policyd-spf
And edit /etc/postfix/main.cf to add and modify these settings:
# add policyd-spf_time_limit
# Incoming Spam Check Policies
policyd-spf_time_limit = 3600
# add check_policy_service unix:private/policyd-spf to smtpd_recipient_restrictions
smtpd_recipient_restrictions = permit_sasl_authenticated, reject_unauth_pipelining, permit_mynetworks, reject_non_fqdn_recipient, reject_unknown_recipient_domain, reject_unauth_destination, check_policy_service unix:private/policyd-spf, permit
Now, restart postfix.
root:$ /etc/init.d/postfix restartYou should now have SPF checks enabled. Your server should receive and accept emails as before, apart from those coming from IP addressess not authorized in SPF records. Check Postfix logs in /var/log/mail.log, your may see lines like this one:
Feb 16 06:24:31 howler postfix/smtpd[247331]: NOQUEUE: reject:
RCPT from unknown[113.118.15.53]: 550 5.7.23 <[email protected]>:
Recipient address rejected:
Message rejected due to: SPF fail - not authorized.
Please see http://www.openspf.net/Why?s=mfrom;[email protected];
ip=113.118.15.53;r=<UNKNOWN>; from=<[email protected]>
to=<[email protected]> proto=ESMTP helo=<[113.118.15.53]>
SPF checks DNS TXT records for hosts authorized to send email. For the domain crusius.de we get this information:
user@server:$ dig crusius.de txt
crusius.de.	3600	IN	TXT	"v=spf1 mx a:howler.frizz.net -all"
The TXT record for crusius.de tells us that the mail exchanger for this domain plus hostname howler.frizz.net are authorized to send email. The “-all” indicates mail servers should reject messages from all other hosts for this domain. Since the IP 113.118.15.53 isn’t associated with any host authorized for crusius.de, Postfix terminates the connection with an error code 550. SPF is a very efficient means of reducing server load due to spam floods with next to no false positives.
Note it’s common for spammers to send mails claiming to originate from domains handled by the recipient server.
Step 5.2: Install Amavis and SpamAssassin
Amavis is an interface connecting MTAs with mail filters, such as ClamAV and SpamAssassin. But before installing any filters, we need to set up Amavis and check it’s working as expected:
apt-get install amavisd-newNow, edit Amavis configuration ’50-user’ under /etc/amavis/conf.d. The middle section of my file looks like this:
# /etc/amavis/conf.d/50-user middle section
@local_domains_acl = qw(.);
$log_level = 2;
$syslog_priority = 'debug';
# $sa_tag_level_deflt = 2.0; # add spam info headers if at, or above that level
# $sa_tag2_level_deflt = 6.31; # add 'spam detected' headers at that level
$sa_kill_level_deflt = 8.0; # triggers spam evasive actions
# $sa_dsn_cutoff_level = 10; # spam level beyond which a DSN is not sent
$final_spam_destiny = D_PASS;
# $final_spam_destiny = D_REJECT; # default
# $final_spam_destiny = D_BOUNCE; # debian default
# $final_spam_destiny = D_DISCARD; # ubuntu default, recommended as sender is usually faked
Unfortunately, Amavis does not offer a final spam destiny in the recipient’s spam folder. Rejecting or discarding mails flagged by SpamAssassin is not ideal because there may be false positives. However, bouncing them is far worse because this will effectively configure the mail server as an open relay targeting faked sender addresses. For now, the best option is D_PASS sending spams to the inbox with a “*** Spam” marker in the subject. In a later step, we’ll learn how to properly divert them into a spam subfolder.
In the Postfix master.cf Amavis is activated as follows:
# append the following to the end of /etc/postfix/master.cf
# ====================================================================
# Mail Filtering
amavis      unix    -       -       -       -       2       smtp
        -o smtp_data_done_timeout=1200
        -o smtp_send_xforward_command=yes
        -o disable_dns_lookups=yes
        -o max_use=20
127.0.0.1:10025 inet    n       -       -       -       -       smtpd
        -o content_filter=
        -o local_recipient_maps=
        -o relay_recipient_maps=
        -o smtpd_restriction_classes=
        -o smtpd_delay_reject=no
        -o smtpd_client_restrictions=permit_mynetworks,reject
        -o smtpd_helo_restrictions=
        -o smtpd_sender_restrictions=
        -o smtpd_recipient_restrictions=permit_mynetworks,reject
        -o smtpd_data_restrictions=reject_unauth_pipelining
        -o smtpd_end_of_data_restrictions=
        -o mynetworks=127.0.0.0/8
        -o smtpd_error_sleep_time=0
        -o smtpd_soft_error_limit=1001
        -o smtpd_hard_error_limit=1000
        -o smtpd_client_connection_count_limit=0
        -o smtpd_client_connection_rate_limit=0
        -o receive_override_options=no_header_body_checks,no_unknown_recipient_checks
Furthermore, in master.cf, add the following below the pickup service line:
# in /etc/postfix/master.cf below pickup
# add content_filter
# and receive_override_options
pickup    unix  n       -       y       60      1       pickup
        -o content_filter=
        -o receive_override_options=no_header_body_checks
Also, in Postfix main.cf, add a content_filter option for Amavis:
# in /etc/postfix/main.cf, add
# amavis
content_filter = amavis:[127.0.0.1]:10024
Now, restart Postfix and check if you can still receive email.
root:$ /etc/init.d/postfix restartMail headers will now show an Amavis line:
Authentication-Results: howler.frizz.net (amavisd-new);If all is well we can uncomment bypass_spam_checks_maps in ’15-content_filter_mode’ under /etc/amavis/conf.d. The same would apply to bypass_virus_checks_maps if you wanted to filter viruses:
#
# Default SPAM checking mode
# Please note, that anti-spam checking is DISABLED by
# default.
# If You wish to enable it, please uncomment the following lines:


@bypass_spam_checks_maps = (
   \%bypass_spam_checks, \@bypass_spam_checks_acl, \$bypass_spam_checks_re);
Finally, we need to install the SpamAssassin package. As root:
apt-get install spamassassin spamc
systemctl enable spamassassin
You should now find emails marked with “*** Spam” in your inbox.
Step 5.3: Redirect Spams to Spam Folder
From the previous step, we have spams marked in the subject line and with a mail header line “X-Spam-Flag: YES”. All we need is post-filtering in the delivery to mail directories to redirect spams to the spam folder. This is traditionally achieved with Courier-Maildrop. However, the integration of maildrop into our Postfix setup is a little bit detailed. Therefore, read about spam-filtering with Maildrop compatible tooling in a separate article.
Step 6: Activate DKIM and Sender Authentication
Sender authentication is crucial for mailer host credibility and email acceptance by third party servers.
Step 6.1: Set Up SPF and DMARC Records
We used SPF in the previous section to filter mails with forged senders. To fulfill our part of the contract, we need to publish SPF DNS records for our mailer domains. In bind9 named file format, the SPF record will look something like this line:
@ IN TXT "v=spf1 mx -all"SPF records should be accompanied by DMARC telling recipient hosts what to do with offending emails.
_dmarc IN TXT "v=DMARC1; p=none; pct=100; rua=mailto:[email protected]; sp=none; aspf=r;"Though in principle SPF already instructs to reject mails from unauthenticated sources, DMARC has the “p” and “sp” fields for actions on domains and subdomains. The real use of DMARC is the abuse notification address. If you get a lot of reports for emails sent with forged addresses from one of your domains, it may make sense to set the “p” and “sp” fields to reject.
Step 6.2: Activate OpenDKIM
DKIM adds digital signatures to email headers to certify authenticity of sender and content. It employs public-private key pairs and cannot be forged by spammers for any of your domains. However, spammers can of course adopt DKIM for their domains, so the gains of sender credibility with other mail operators are limited. Still, DKIM is worth having. To begin with, install OpenDKIM:
root:$ apt-get install opendkim opendkim-toolsNow, in /etc/default/opendkim and /lib/systemd/system/opendkim.service, change the OpenDKIM rundir and pidfile under the Postfix chroot:
# in /etc/default/opendkim
# Change to /var/spool/postfix/run/opendkim to use a Unix socket with
# postfix in a chroot:
RUNDIR=/var/spool/postfix/var/run/opendkim


# in /lib/systemd/system/opendkim.service
# in [service] section
PIDFile=/var/spool/postfix/var/run/opendkim/opendkim.pid
Also, create the run directory and add Postfix to the opendkim group:
root:$ mkdir -p /var/spool/postfix/var/run/opendkim
root:$ chown opendkim.opendkim /var/spool/postfix/var/run/opendkim
root:$ adduser postfix opendkim
Additionally, you may want to make sure the opendkim home directory matches the rundir:
root:$ grep opendkim /etc/passwd
opendkim:x:126:132::/var/spool/postfix/var/run/opendkim:/usr/sbin/nologin
Now edit /etc/opendkim.conf:
# Since we're using key tables, there is no need to add all of your domains here:
Domain                  yourdomain.com
Selector                s2048

# allow subdomains
SubDomains              yes

Socket                  local:/var/spool/postfix/var/run/opendkim/opendkim.sock
ExternalIgnoreList      /etc/opendkim/TrustedHosts
InternalHosts           /etc/opendkim/TrustedHosts
KeyTable                /etc/opendkim/KeyTable
SigningTable            /etc/opendkim/SigningTable

##  PidFile filename
PidFile               /var/spool/postfix/var/run/opendkim/opendkim.pid
Set up the trusted hosts in /etc/opendkim/TrustedHosts:
127.0.0.1
85.214.104.162
2a01:238:42cd:0:4be7:4eb2:c4a7:8464
localhost
mx0.yourdomain.com
In Postfix master.cf, add no_milters for Amavis:
# in /etc/postfix/master.cf: add no_milters
127.0.0.1:10025 inet    n       -       -       -       -       smtpd
        -o content_filter=
        -o local_recipient_maps=
        -o relay_recipient_maps=
        -o smtpd_restriction_classes=
        -o smtpd_delay_reject=no
        -o smtpd_client_restrictions=permit_mynetworks,reject
        -o smtpd_helo_restrictions=
        -o smtpd_sender_restrictions=
        -o smtpd_recipient_restrictions=permit_mynetworks,reject
        -o smtpd_data_restrictions=reject_unauth_pipelining
        -o smtpd_end_of_data_restrictions=
        -o mynetworks=127.0.0.0/8
        -o smtpd_error_sleep_time=0
        -o smtpd_soft_error_limit=1001
        -o smtpd_hard_error_limit=1000
        -o smtpd_client_connection_count_limit=0
        -o smtpd_client_connection_rate_limit=0
        -o receive_override_options=no_header_body_checks,no_unknown_recipient_checks,no_milters
And in Postfix main.cf, add settings for milters:
# in /etc/postfix/main.cf
# opendkim
milter_default_action = accept
smtpd_milters = unix:/var/run/opendkim/opendkim.sock
non_smtpd_milters = unix:/var/run/opendkim/opendkim.sock
Now, we need to generate keys and set up key tables for all domains we want to send emails for. It’s best to write a shell script for that job:
#!/bin/bash
# usage: make_key.sh domain

DOMAIN=$1
OPENDKIMDIR=/etc/opendkim
KEYDIR="$OPENDKIMDIR/keys"
umask 027
if [ -z $DOMAIN ] ; then
	echo "Usage $0 FQDN"
	exit 1
fi
if [ ! -d $KEYDIR ] ; then
	mkdir $KEYDIR
fi
BITS=2048
SELECTOR="s$BITS"
opendkim-genkey -b $BITS -s $SELECTOR -r -d $DOMAIN
KDIR="$KEYDIR/$DOMAIN"
mkdir $KDIR
mv ./$SELECTOR.* $KDIR
chmod 600 $KDIR/*
chown -R opendkim.opendkim $KDIR
# add to key table
KSIGN="$OPENDKIMDIR/SigningTable"
echo "$DOMAIN $SELECTOR._domainkey.$DOMAIN" >> $KSIGN
KTAB="$OPENDKIMDIR/KeyTable"
echo "$SELECTOR._domainkey.$DOMAIN $DOMAIN:$SELECTOR:/etc/opendkim/keys/$DOMAIN/$SELECTOR.private" >> $KTAB
The script adds entries to /etc/opendkim/KeyTable and /etc/opendkim/SigningTable as well as key files under /etc/opendkim/keys. The public key will be under /etc/opendkim/keys/. Sample output for yourdomain.com:
root:$ make_key.sh yourdomain.com
root:$ cat /etc/opendkim/keys/yourdomain.com/s2048.txt
s2048._domainkey	IN	TXT	( "v=DKIM1; h=sha256; k=rsa; s=email; "
	  "p=MIIBIjANBgkqhkiG9w0BAQEFAAOCAX8AMIIBCgKCAQEApQWShqDPRmRmSmyJn5JgxcQwSxtSqDAk6xVGl62TxWsmsBpzpLTqKwj2w1/Tutf1axD9JciBr8AO2Eo+VVxEJDT5HqJ9mWlv7ExsTEpuPzc63+enn8K/UCk+mOHZUKeoQeFCrysfTmz5AZF7Y6X3ICmYg/E6DPrCnB7Hqz0Wqh++Uvm4MAUQ0N1uHp2vWKiQ4yLYS902mCdwGB"
	  "z9ZMyGRT91XiwfXctAz2I0s9AMia7HT99XdnIIaDpxzB+8ZhUNHooKwaiHUlT0RiQo6yZPVnierLhWmdYlhI/td/ghHlY5DBJhAhxK8KCxJtNz733G59AgpusnFjW0j665udDcDwIDAQAB" )  ; ----- DKIM key s2048 for yourdomain.com
The contents of the public key, up to the closing parenthesis, is what you need to copy into your DNS zone file to get DKIM to work.
Your completed zone file might then look like this:
$TTL 1H
@		IN SOA	ns1.yourdomain.org. hostmaster.yourdomain.com. (
				20220202	; serial
				2H		; refresh
				2H		; retry
				6W		; expiry
				1H )		; minimum
;
		NS	ns1.yourdomain.org.
		NS	ns2.yourdomain.org.
		NS	ns3.yourdomain.org.
;
@		IN TXT	"v=spf1 mx -all"
s2048._domainkey	IN	TXT	( "v=DKIM1; h=sha256; k=rsa; s=email; "
	  "p=MIIBIjANBgkqhkiG9w0BAQEFAAOCAX8AMIIBCgKCAQEApQWShqDPRmRmSmyJn5JgxcQwSxtSqDAk6xVGl62TxWsmsBpzpLTqKwj2w1/Tutf1axD9JciBr8AO2Eo+VVxEJDT5HqJ9mWlv7ExsTEpuPzc63+enn8K/UCk+mOHZUKeoQeFCrysfTmz5AZF7Y6X3ICmYg/E6DPrCnB7Hqz0Wqh++Uvm4MAUQ0N1uHp2vWKiQ4yLYS902mCdwGB"
	  "z9ZMyGRT91XiwfXctAz2I0s9AMia7HT99XdnIIaDpxzB+8ZhUNHooKwaiHUlT0RiQo6yZPVnierLhWmdYlhI/td/ghHlY5DBJhAhxK8KCxJtNz733G59AgpusnFjW0j665udDcDwIDAQAB" )
_dmarc		IN TXT  "v=DMARC1; p=none; pct=100; rua=mailto:[email protected]; sp=none; aspf=r;"
@		A	1.2.3.4


@		MX	10 mx0.yourdomain.com.
www		CNAME	@
References
I used this excellent guide by Ivar Abrahamsen as a basis for my installation: https://flurdy.com/docs/postfix/
You may also find this somewhat aged installation manual helpful, equally based on Ivar’s guide. However, note that in this source some of the chroot environments are missing: https://www.lisenet.com/2014/postfix-courier-imap-mysql-sasl-tls-on-debian-wheezy/
Documentation for the Sender Policy Framework (SPF) can be found here: http://www.open-spf.org/Introduction/
The Amavis Filter Framework is described here: https://amavis.org/